Configuring Exclusion Settings in CatchPulse Policy
CatchPulse automatically scans your entire computer with Cloud AV once every 24 hours and provides real-time protection against new possible threats that are saved to your PC's hard drive.
However, you can manually exclude files and folders from being scanned. Files and folders added to the exclusion list will not be scanned by CatchPulse's offline and cloud AVs, and their contents will not be uploaded to the cloud.
Jump to:
Adding a New User-Defined Exclusion
Deleting a User-Defined Exclusion
Adding a New User-Defined Exclusion
To add a New User-Defined Exclusion
-
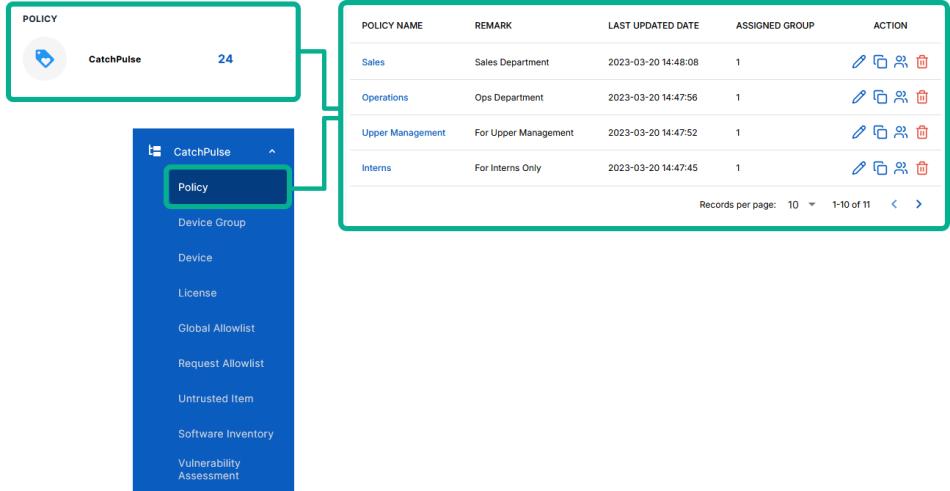
From the main navigation bar, go to CatchPulse → Policy.
-
Do one of the following:
-
Click Add Policy from the top right corner of the Policy page, or
-
Select a policy and click on the corresponding
 button.
-
-
On the Policy page, under Manage → Exclusion.
-
On the New Exclusion display box, enter the file name that you want to add to the exclusion list.
-
(Optional) Select Add another to continue adding another exclusion.
-
Select Add.
The notification panel at the bottom of the page indicates the Exclusion was added successfully.
Deleting a User-Defined Exclusion
To delete a User-Defined Exclusion
-
From the main navigation bar, go to CatchPulse → Policy.
-
Select a policy and click on the corresponding
button. -
On the Policy page, under Manage → Exclusion.
-
Select an Exclusion entry and click on the corresponding
 button.
 -
When prompted to remove the selected Exclusion entry, select Delete.
The notification panel at the bottom of the page indicates the Exclusion entry was deleted.
Support and feedback
Should you encounter any issues using the SecureAge Central with any of the mentioned or missed requirements above, you can always write to us a docs@secureage.com.
This page was last updated: May 07, 2026