Manage Email Notification
Note: This section applies to users who have a valid CatchPulse Pro license
Stay informed with email notifications about allowlists and virus alerts in SecureAge Central. This ensures that you are always updated with the current information and can immediately take necessary actions to deal with any potential threats.
Jump to:
Add email address to receive notifications
Opt in or out of the Request Allowlist, Agent Health Service, or Virus Alerts email notification
Control how often you receive email notifications when an untrusted item is blocked
Removing an email address from the notification list
Add email address to receive notifications
To add email address to receive notifications
-
Do one of the following:
-
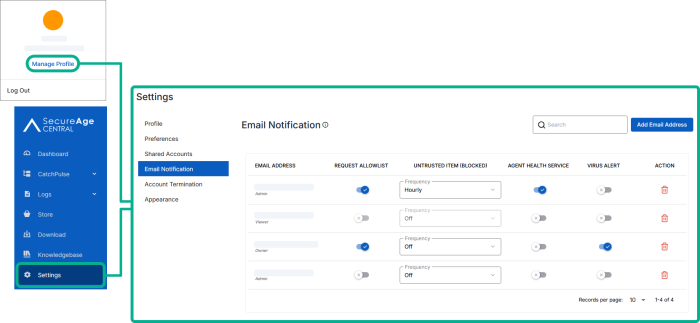
On the top right corner of the SecureAge Central interface, select the account icon or avatar with your initials and click Manage Profile.
-
On the main navigation bar, go to Settings→ Email Notification.
-
-
Click Add Email Address from the top right corner of the Shared Accounts page.
-
Enter the email address when prompted.
-
Click Add.
The notification panel at the bottom of the page indicates the email address was added.
Opt in or out of the Request Allowlist, Agent Health Service, or Virus Alerts email notification
To opt in or out of Request Allowlist, Agent Health Service or Virus Alerts email notification
-
Do one of the following:
-
On the top right corner of the SecureAge Central interface, select the account icon or avatar with your initials and click Manage Profile.
-
On the main navigation bar, go to Settings→ Email Notification.
-
-
Select an account and opt in and out of Request Allowlist, Agent Health Service, or Virus Alert notifications toggle.
The notification panel at the bottom of the page indicates the new preferences has been saved.
Control how often you receive email notifications when an untrusted item is blocked
To control how often you receive email notifications when an untrusted item is blocked
-
Do one of the following:
-
On the top right corner of the SecureAge Central interface, select the account icon or avatar with your initials and click Manage Profile.
-
On the main navigation bar, go to Settings→ Email Notification.
-
-
Select an account and click on the corresponding Untrusted Item (Blocked) Frequency drop down menu.
-
Off: No email notifications will be sent.
-
Hourly: You will receive a summary of blocked items every hour.
-
Daily: You will receive a daily summary of blocked items.
Tip: Use hourly notifications if you need to closely monitor new or suspicious activity. Use daily summaries if you only want a high-level overview.
The notification panel at the bottom of the page indicates the new preferences has been saved.
-
Removing an email address from the notification list
To remove an email address from the notification list
-
Do one of the following:
-
On the top right corner of the SecureAge Central interface, select the account icon or avatar with your initials and click Manage Profile.
-
On the main navigation bar, go to Settings→ Email Notification.
-
-
To delete an email address, select an account and click on the corresponding
 icon.
icon. -
When prompted to confirm deleting selected policy, choose Delete Entry.
The notification panel at the bottom of the page indicates the account was deleted.
Support and feedback
Should you encounter any issues using the SecureAge Central with any of the mentioned or missed requirements above, you can always write to us a docs@secureage.com.
This page was last updated: September 02, 2025