Configuring Trusted Certificate Allowlist Settings in CatchPulse Policy
In order to ensure the security of your devices, it is essential to manage the trusted certificates that are utilized by your applications. By maintaining a list of legitimate certificates, you can ensure that only authorized certificates are automatically trusted, thereby significantly reducing the risks of unauthorized access or data breaches.
Jump to:
Adding Trusted Certificate Allowlist
Removing from Trusted Certificate Allowlist
Deleting a Trusted Certificate
Adding Trusted Certificate Allowlist
To add Trusted Certificate Allowlist
-
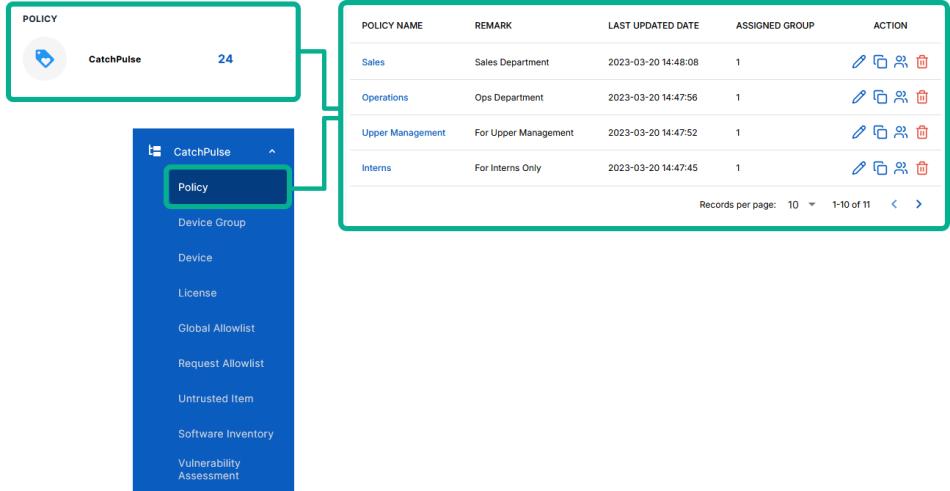
From the main navigation bar, go to CatchPulse → Policy.
-
Do one of the following:
-
To add a Trusted Certificate to a new policy, click on the Add Policy button located at the top right corner of the Policy page, or
-
To add a Trusted Certificate to an existing policy, select a policy and click on the corresponding
 button.
-
-
On the Policy page, under Manage → Trusted Certificate Allowlist.
-
Click Add from the top right corner of the Trusted Certificate Allowlist page.
-
On the Trusted Certificate Allowlist display box, upload the certificate file.
Only files with .cer, .crt, or .der file extensions are accepted.
-
(Optional) Select Add another to continue adding more Trusted Certificates.
-
Click Add to add Trusted Certificate.
The notification panel at the bottom of the page indicates the Trusted Certificate was added successfully.
Removing Trusted Certificate Allowlist
To remove Trusted Certificate Allowlist
-
From the main navigation bar, go to CatchPulse → Policy.
-
Select a policy and click on the corresponding
button. -
On the Policy page, under Manage → Trusted Certificate Allowlist.
-
Do one of the following:
-
If the certificate is listed in the Add to Trusted Certificate Allowlist grid:
-
Select a Certificate from the grid, click on the corresponding
 button.
 -
In the Move Trusted Certificate Allowlist dialog box, click Move.
A notification panel at the bottom of the page confirms the update
-
-
If the application is not listed in the Add to Trusted Certificate Allowlist grid:
-
Click Add at the top right corner of the Trusted Certificate page.
-
In the Trusted Certificate Allowlist dialog box, set Action to Remove.
-
Choose the certificate file.
-
Click Add.
A notification panel at the bottom of the page confirms the update
-
-
Deleting a Trusted Certificate
To delete a Trusted Certificate
-
From the main navigation bar, go to CatchPulse → Policy.
-
Select a policy and click on the corresponding
button. -
On the Policy page, under Manage → Trusted Certificate Allowlist.
-
Choose either Add To Trusted Certificate Allowlist or Remove From Trusted Certificate Allowlist tab.
-
Select a Trusted Certificate and click on the corresponding
 button.
 -
When prompted to delete a Trusted Certificate, select Delete.
The notification panel at the bottom of the page indicates the Trusted Certificate was deleted.
Note: Deleting the trusted certificate allowlist from the grid simply removes the entry from the corresponding tabs.
If you deleted the Trusted Certificate Allowlist in the Add To Trusted Certificate Allowlist tab, it means that the certificate is no longer configured explicitly as an allowed certificate when the user receives the policy. However, note that for users who have already trusted/ allowed it, it will remain unchanged. For users who have not run it, the usual allowlisting logic will take place.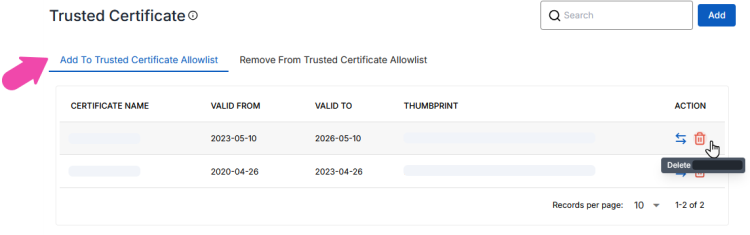
If you deleted the Trusted Certificate in the Remove From Trusted Certificate Allowlist tab, it means that the application is no longer configured explicitly as a Untrusted Certificate. Now, for any users running it, the usual allowlisting logic will take place.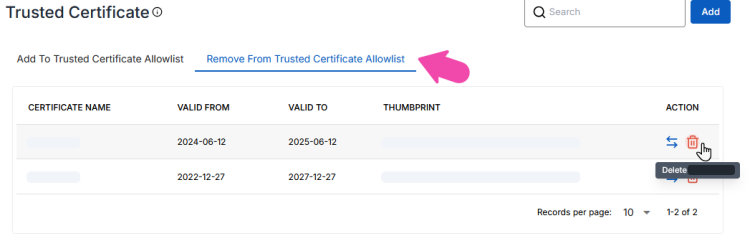
More information
Support and feedback
Should you encounter any issues using the SecureAge Central with any of the mentioned or missed requirements above, you can always write to us a docs@secureage.com.
This page was last updated: May 07, 2026